User manual

Find the task you need.

This is a reference manual, not a tour. Choose a view or search for an action, then follow the instructions beside the matching app screen.

This page is read-only. Nothing here can change an apartment or the building.

Manual for

Frequently used

On this page

Access and security

Accept an invitation and create access

Complete the mandatory date-of-birth check, then use the landlord's invitation once to create your private passkey.

In the appInvitation link → Install app → Accept access

What to do

  1. Install Gabor Villa from the App Store before accepting the invitation.
  2. Return to the same invitation link and tap Accept access.
    Invitation web page with App Store installation and Accept access actionsOpen full-size screenshot
    Step 2Install first, then return to the same page and accept access
  3. Enter the name the landlord will recognise and the same date of birth the landlord recorded. Date-of-birth validation is mandatory; a mismatch stops setup. Then choose Create Secure Access and confirm Apple's passkey prompt with Face ID or your device passcode.
    Apartment Invitation screen with Create Secure Access and Use an Existing PasskeyOpen full-size screenshot
    Step 3Create new access here; Existing Passkey signs into an account you already have
  4. If you already have Gabor Villa access, tap Use an Existing Passkey to sign in to that existing account. This does not accept the new invitation.
  5. If another account or the demo is already open, choose Continue in Open this invitation?. The app leaves the current access, keeps its passkey saved, and then opens invitation setup. Cancel leaves the current account unchanged.

What you should see

After successful date-of-birth validation, the app opens your apartment automatically once the scheduled access start date is reached. There is no password and no resident/landlord selector.

Important

The single-use invitation link expires after seven days, independently of the scheduled access-validity window. Access cannot be used before its scheduled start date and is revoked automatically after its scheduled end date. Each resident account belongs to one apartment. Ask the landlord for a new invitation if the link was cancelled, used, expired, or the dates are wrong.
Back to topics ↑

Sign in, unlock, or recover access

Use the saved passkey and the iPhone's own security.

In the appWelcome Back → Sign in with Passkey

What to do

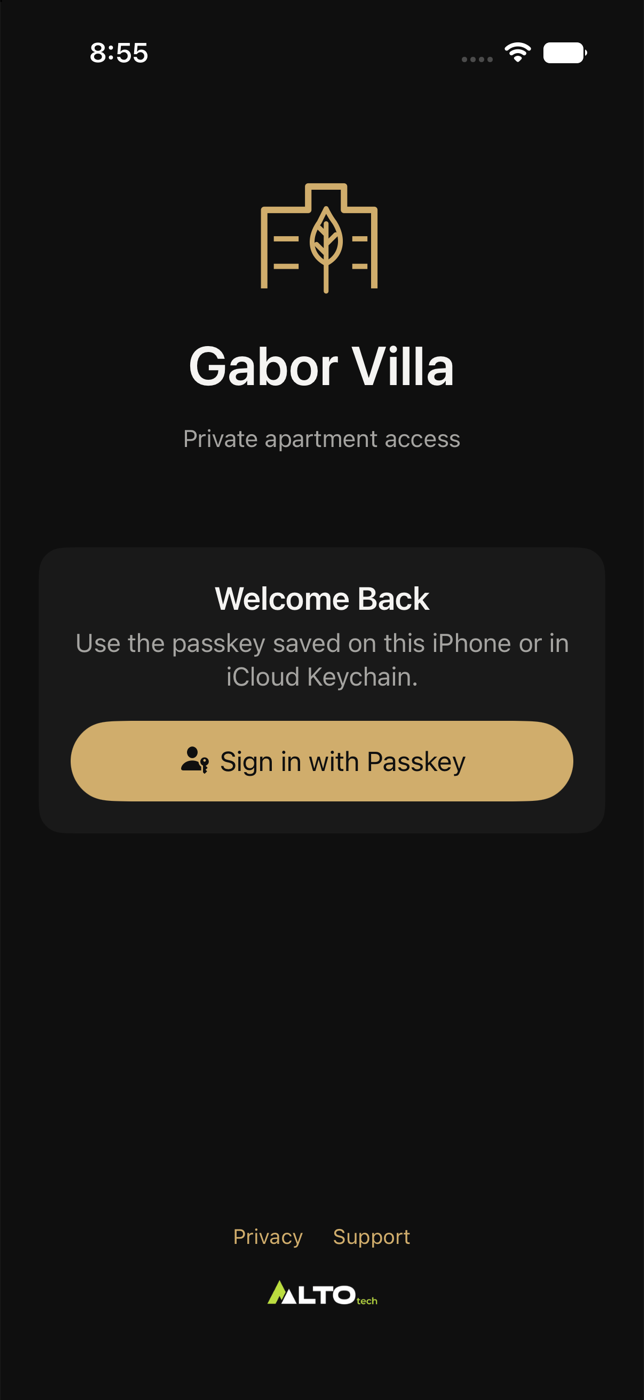
  1. Tap Sign in with Passkey and choose the correct Gabor Villa passkey in Apple's prompt.
    Welcome Back screen with passkey sign-inOpen full-size screenshot
    Step 1Neutral sign-in screen
  2. Confirm with Face ID, Touch ID, or the iPhone passcode.
  3. After a cold start, and after the app has been in the background for 30 seconds, Face ID or the iPhone passcode appears automatically. Tap Unlock only if that attempt was cancelled or failed.
  4. If Retry Saved Session appears, use it before signing in again. If access was revoked or expired, contact the landlord for a new invitation.
  5. Privacy, Support and the AltoTech website remain available at the bottom of Welcome Back before you sign in.

What you should see

Your role and apartment are selected from the passkey. Signing out does not delete the passkey from your iPhone.

Important

A landlord and resident passkey can exist on the same iPhone. Read the name in Apple's passkey chooser before confirming.
Back to topics ↑

Home, rooms and climate

Read the Home screen

Check outdoor conditions, climate mode, rooms and their latest values.

In the appHome

What to do

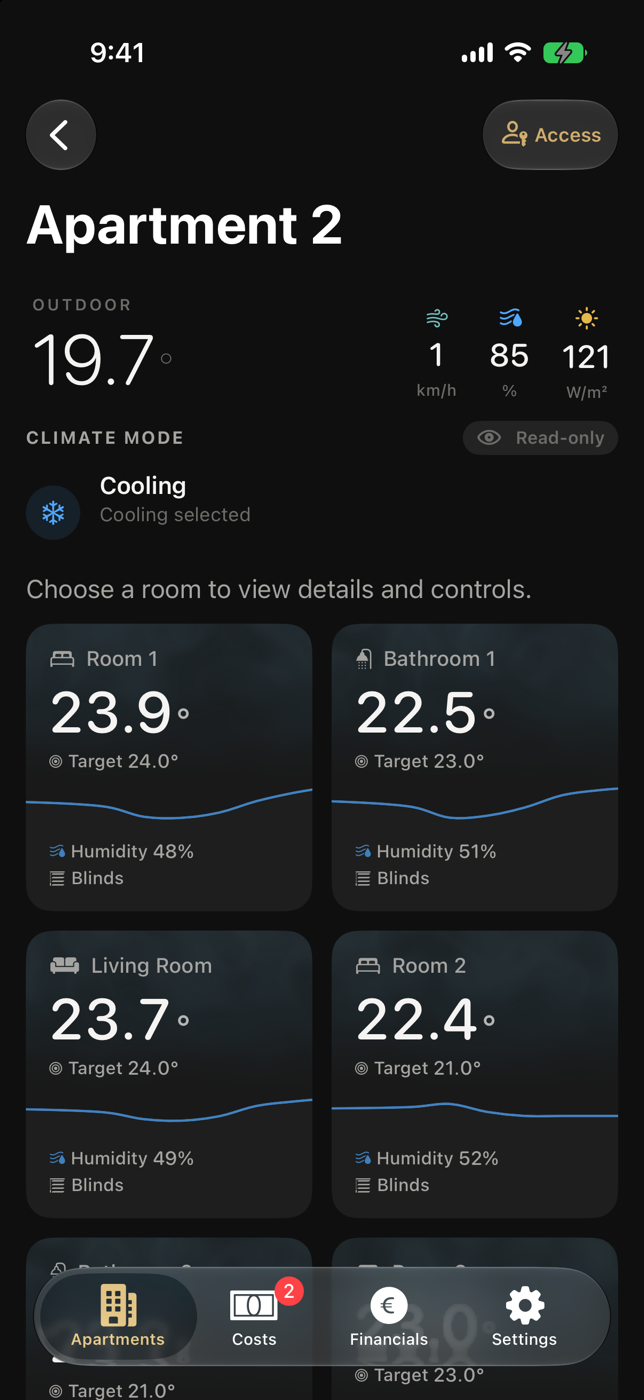
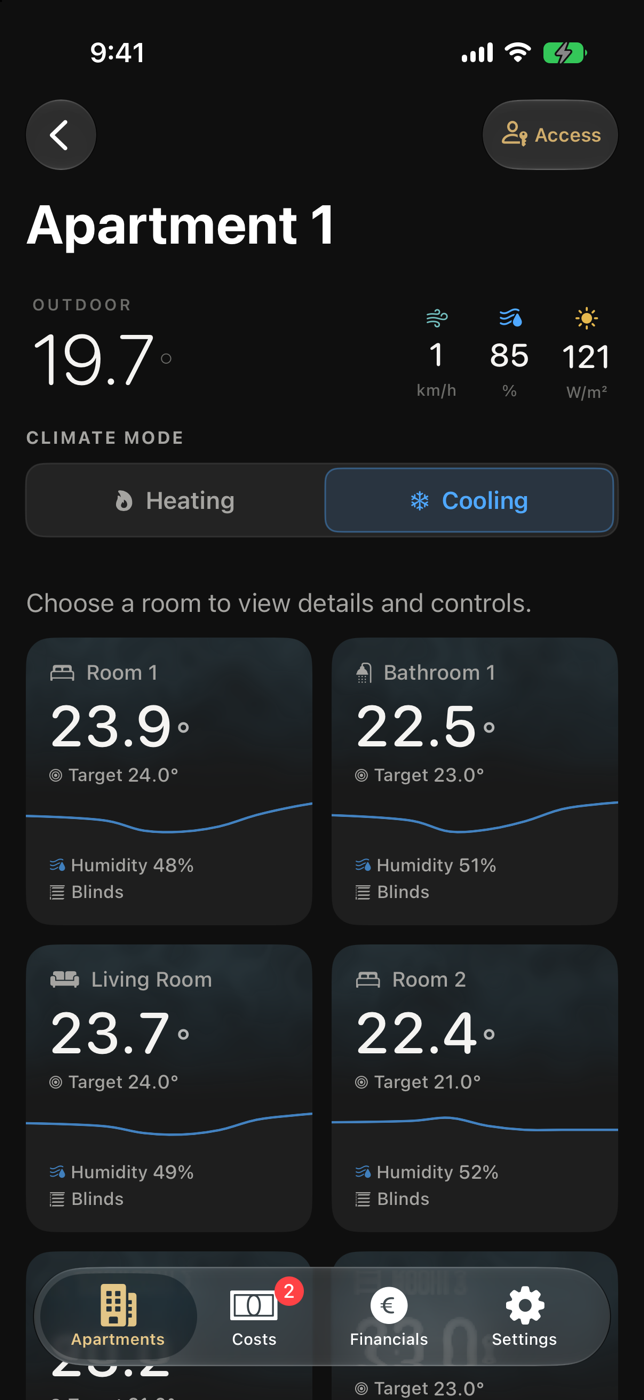
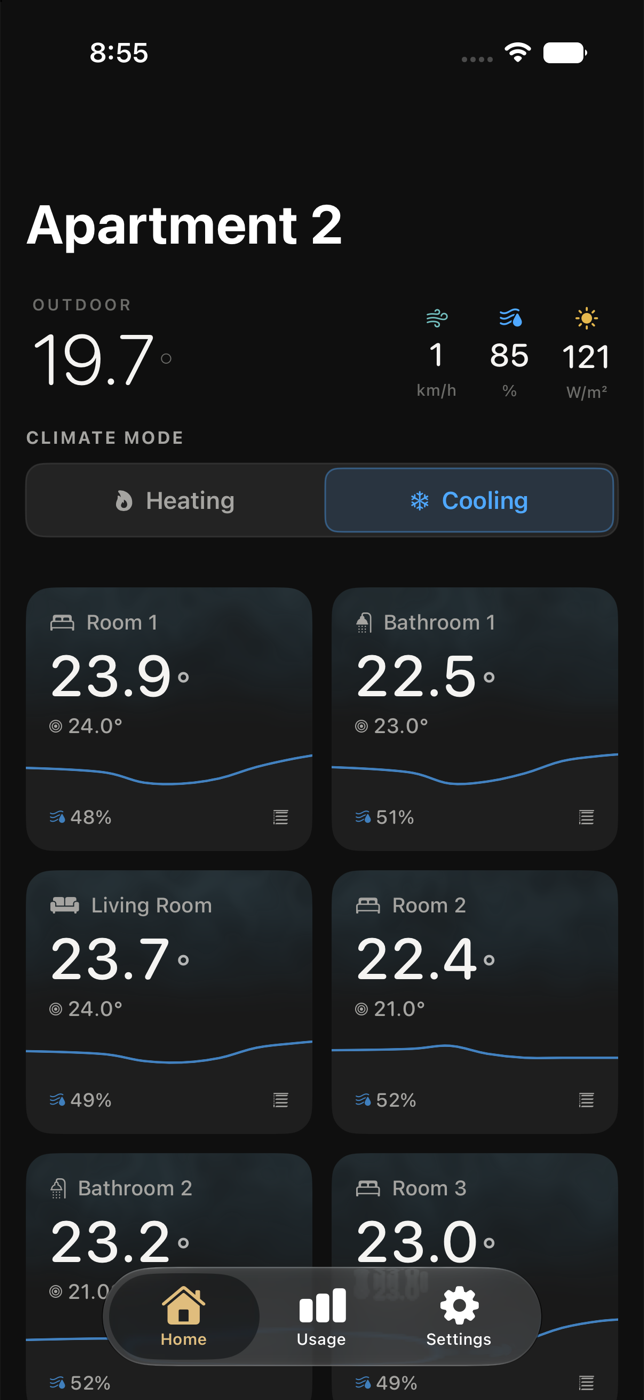
  1. The Outdoor row shows available temperature, wind, humidity and sunlight readings.
  2. Each room card shows the current temperature in large type, the target temperature below it, humidity, the last 24-hour trend and whether blinds are present.
  3. Tap a room for controls and the longer temperature history. Pull down to refresh the apartment.
  4. A clock warning means the app is showing the last known values. Tap it for the update time. Missing values are left blank rather than shown as zero.

What you should see

The Home screen gives a quick current view; it does not imply that the room has already reached its target.

If this is unavailable

If Connection Error appears, tap Retry once. If it persists, open Settings → System Status rather than repeating control actions.

Back to topics ↑

Switch between heating and cooling

Each mapped apartment has a manual, apartment-wide climate switch when Control security is Ready.

In the appHome → Climate Mode

What to do

  1. Check the currently highlighted mode before making a change.
    Cooling selected in the Climate Mode controlOpen full-size screenshot
    Step 1Cooling is selected for the whole apartment
  2. Tap Heating or Cooling once. Wait while the controller confirms the requested mode.
  3. Room temperature controls automatically use the colour and behaviour of the active mode.

What you should see

The selected mode remains highlighted after confirmation. Heating and cooling are manual choices; Automatic and Off are not app controls.

Important

Only Heating and Cooling are selectable. Off and Automatic may be reported when the building controller chose them, but the app never sends those modes.

If this is unavailable

Controller off or Controller override means the building controller is currently deciding the state. Read-only can also mean this iPhone could not be securely verified.

Back to topics ↑

Set one room's temperature

Drag for a larger change or use plus and minus for 0.5 °C adjustments.

In the appHome → Room → Set temperature

What to do

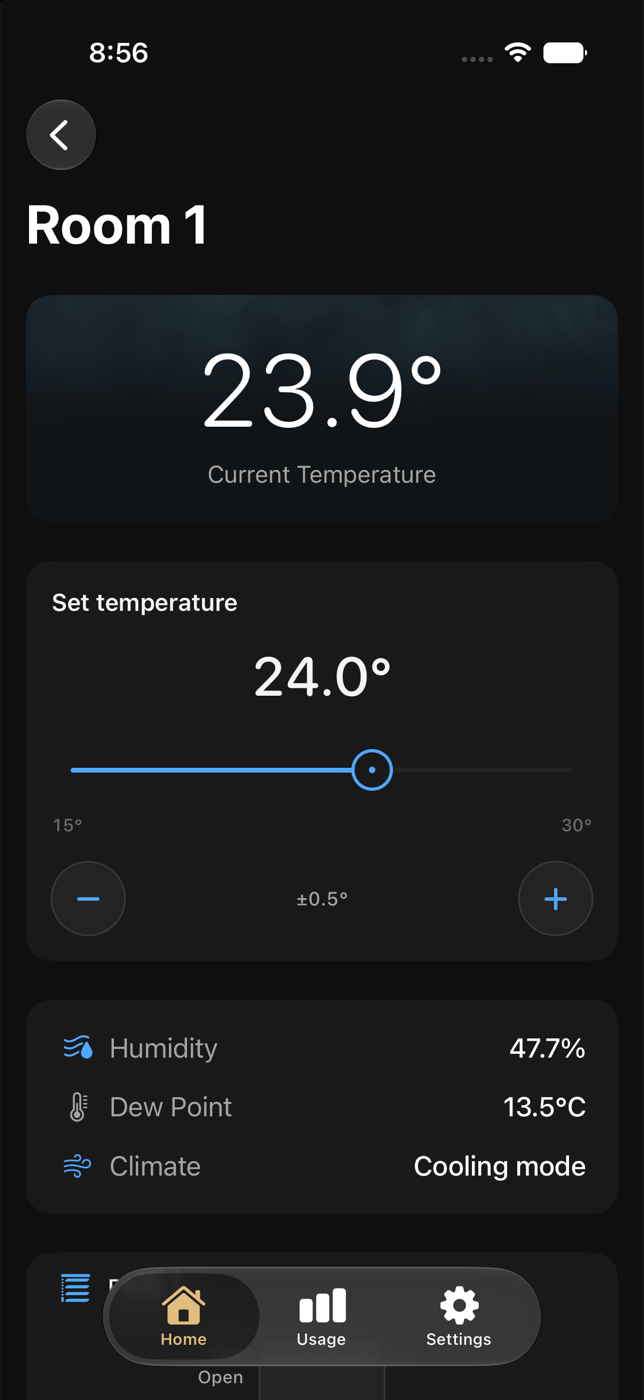
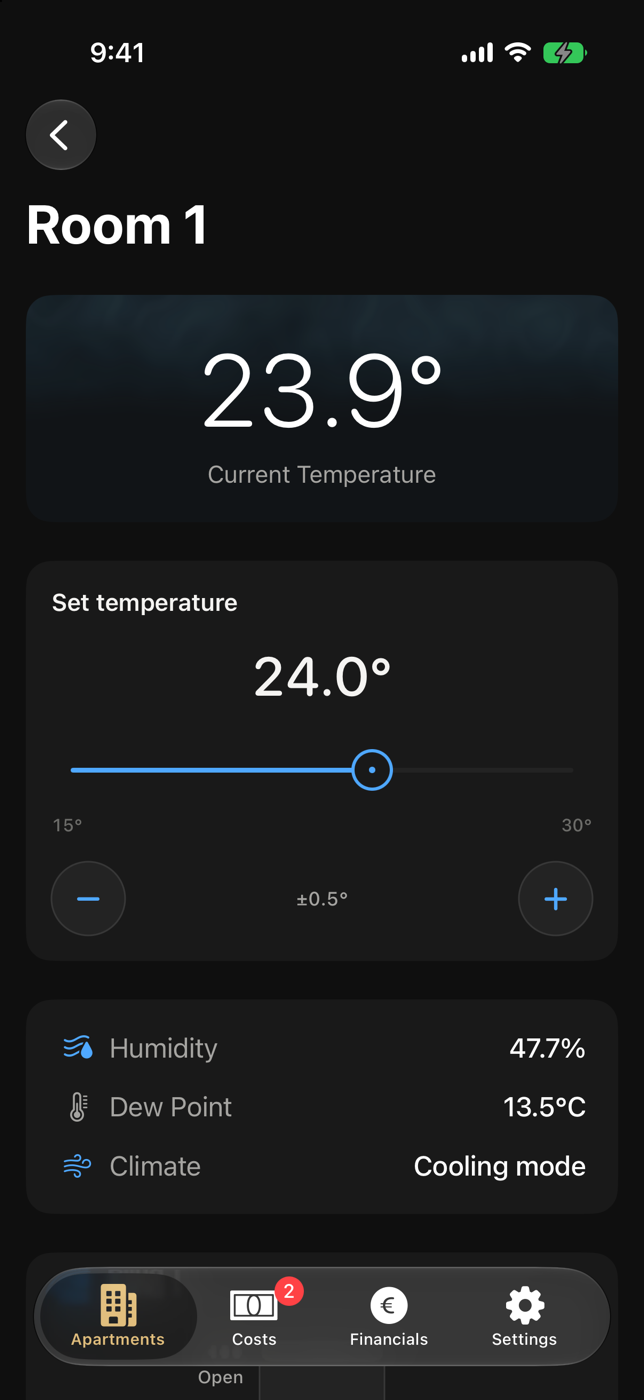
  1. Open the room you want to adjust. The large value at the top is the current temperature.
    Room detail with current temperature and target controlOpen full-size screenshot
    Step 1Current temperature above; target control below
  2. Below the temperature control, Humidity shows relative humidity, Dew Point appears when available, and Climate shows the apartment's current heating or cooling state.
  3. Move the horizontal slider to a target between 15 °C and 30 °C.
  4. Use minus or plus for a precise 0.5 °C change. The app sends the value when you finish dragging or tapping.
  5. Wait for the pending state to clear. The physical room changes gradually; repeated taps do not make it react faster.
What you should see

The target value remains at the confirmed setting while the current temperature continues to update separately.

If this is unavailable

Read-only means your access or device cannot currently make changes. A control error should be retried only after System Status is healthy.

Back to topics ↑

Review temperature history or rename a room

See the rolling two-day trend and use private display names.

In the appHome → Room → Temperature History / Rename room

What to do

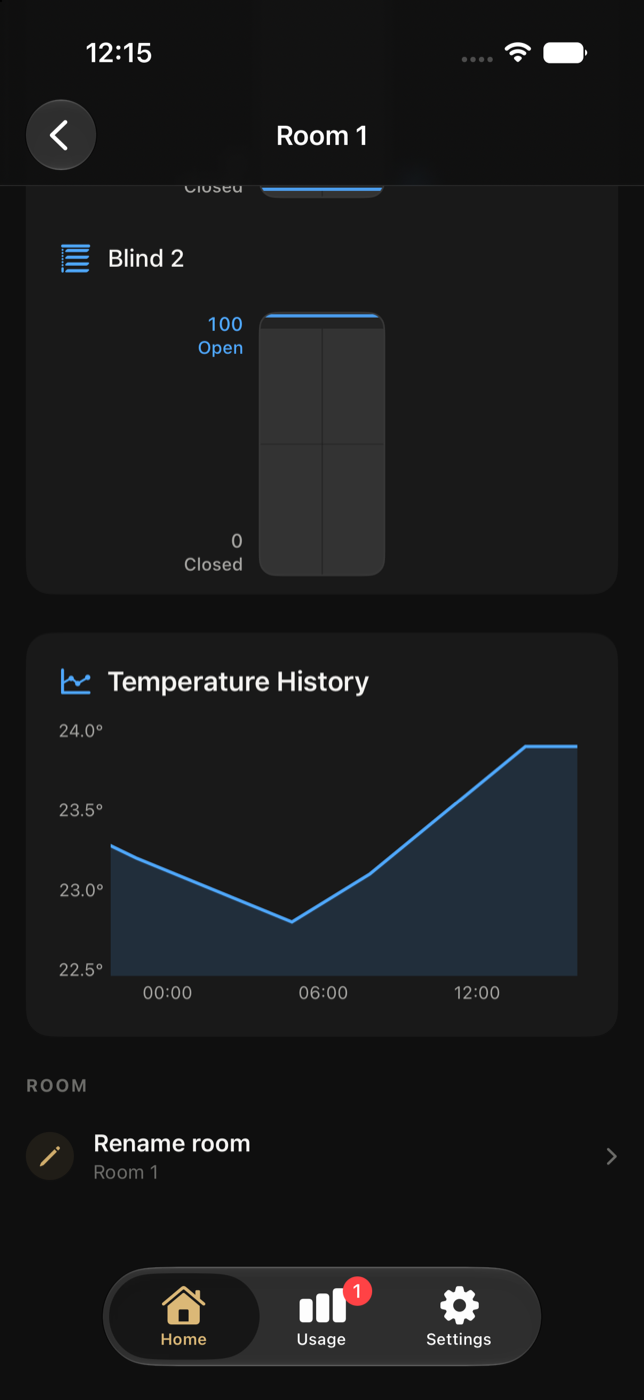
  1. Scroll below the room controls to Temperature History.
    Temperature History chart and Rename room actionOpen full-size screenshot
    Step 1History and the room-name action
  2. Swipe the chart horizontally to see older readings; about 18 hours are visible at once within the rolling two-day history.
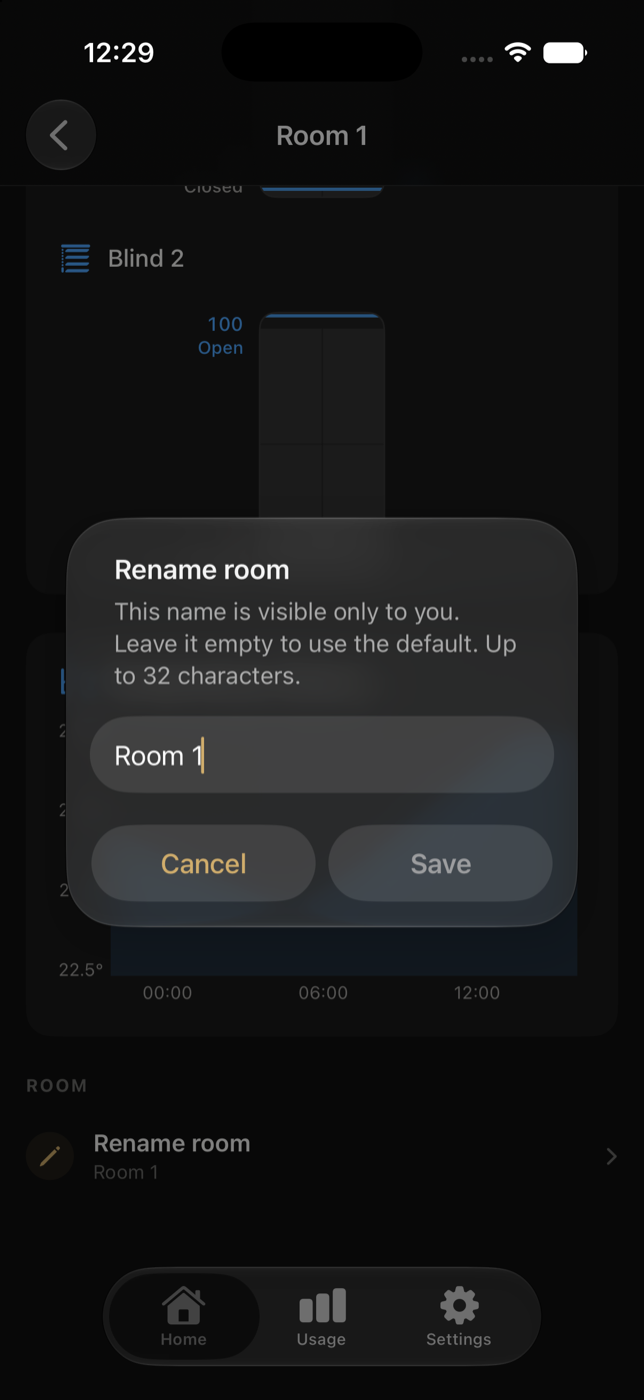
  3. At the bottom, tap Rename room, enter a short name and tap Save. Leave the field empty to restore the default name.
    Rename Room dialog with name field, Cancel and SaveOpen full-size screenshot
    Step 3Enter the display name in the small rename dialog

What you should see

The chart follows real sampled readings. A custom room name is private to the resident and does not change the building controller.

Important

Rename apartment is at the bottom of Home in Whole Apartment. It works the same way and an empty name restores Apartment 0–3.

Back to topics ↑

Move or stop one blind

The marker is your target; the coloured fill is the sampled physical position.

In the appHome → Room → Blind

What to do

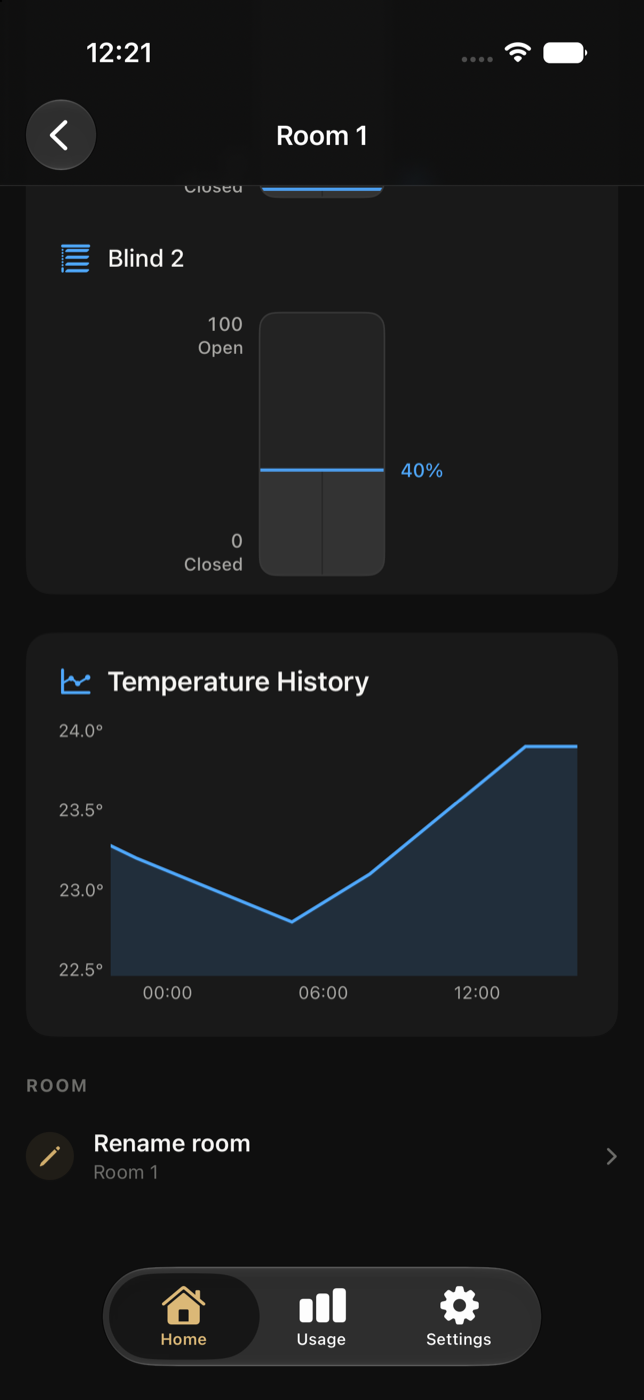
  1. Find the correct blind by name. At the top, 100% Open means fully raised; at the bottom, 0% Closed means fully lowered.
    Vertical blind controls showing open and closed endpointsOpen full-size screenshot
    Step 1Each blind has its own vertical target control
  2. Drag the target marker to the position you want and release it.
  3. While the blind moves, its current-position fill travels towards the target. The two may show different percentages.
  4. Tap Stop if it appears and you need to halt the movement immediately.

What you should see

After movement is verified, the current position catches up to the target. Returning to the screen restores both the requested target and the latest physical position.

If this is unavailable

Waiting for confirmed position means the building controller has not yet reported the final value. Leave the window area clear and let the app confirm the position before trying again.

Back to topics ↑

Whole-apartment actions

Find whole-apartment actions and rename the apartment

These less frequent actions are grouped at the bottom of Home.

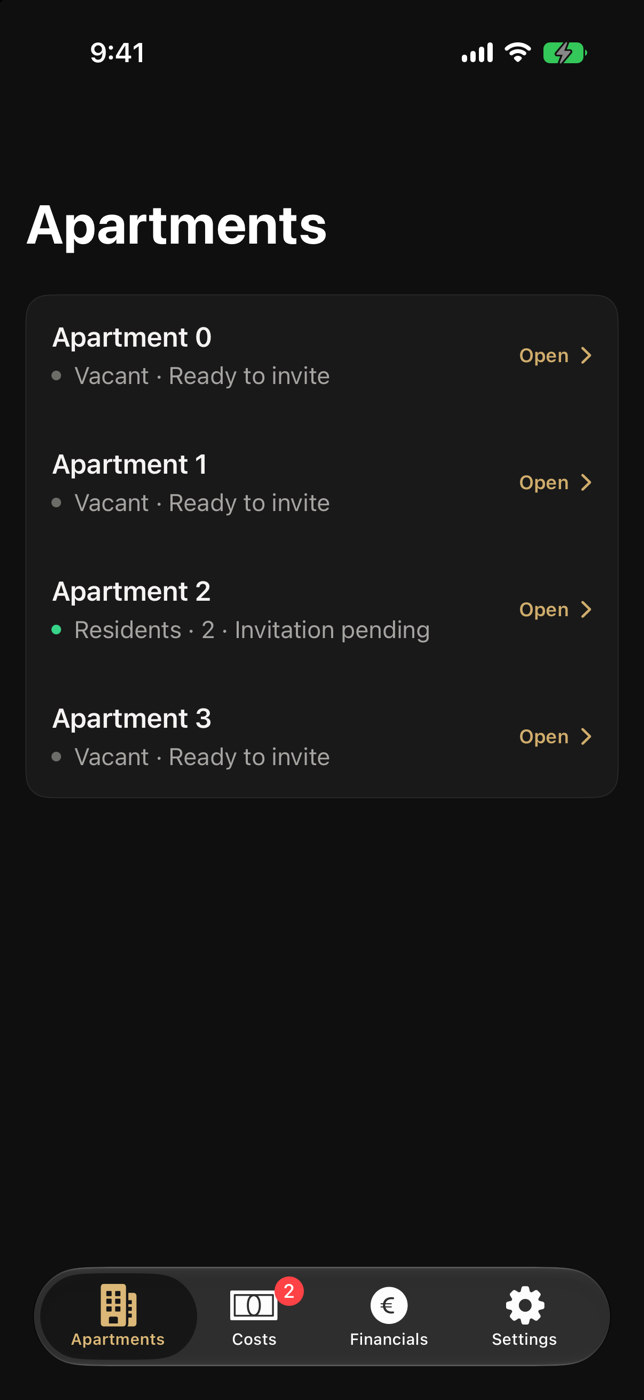
In the appHome → bottom of page → Whole Apartment

What to do

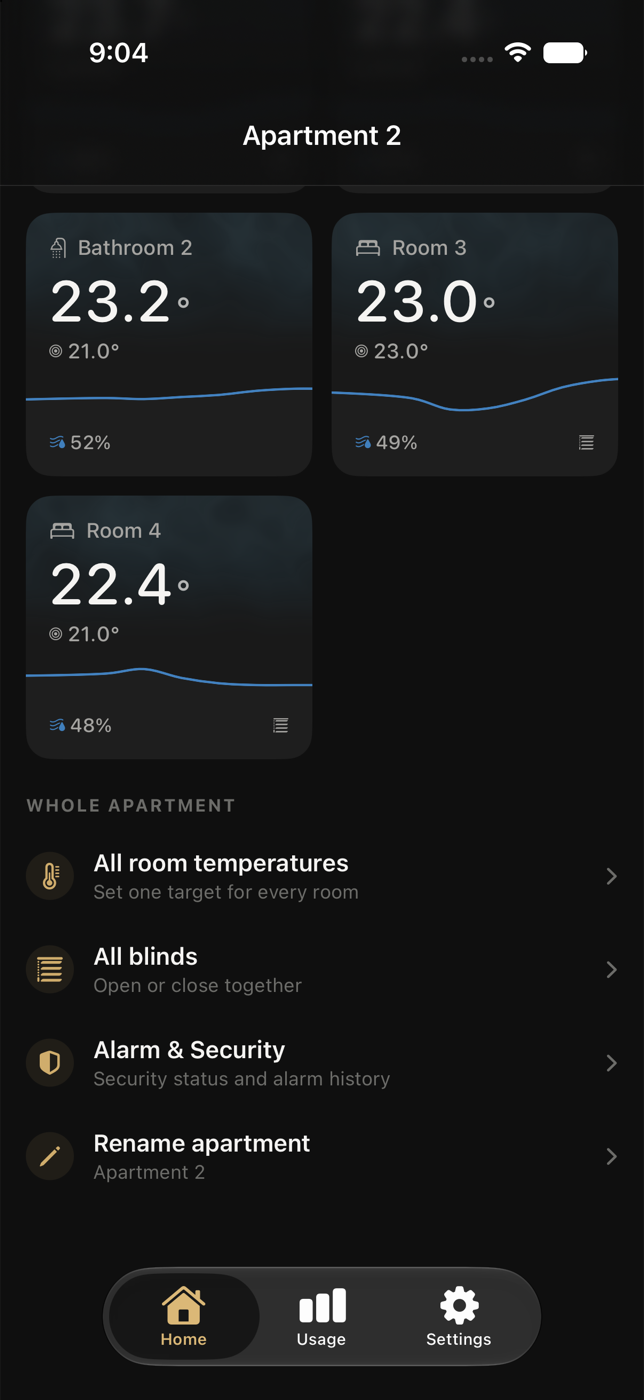
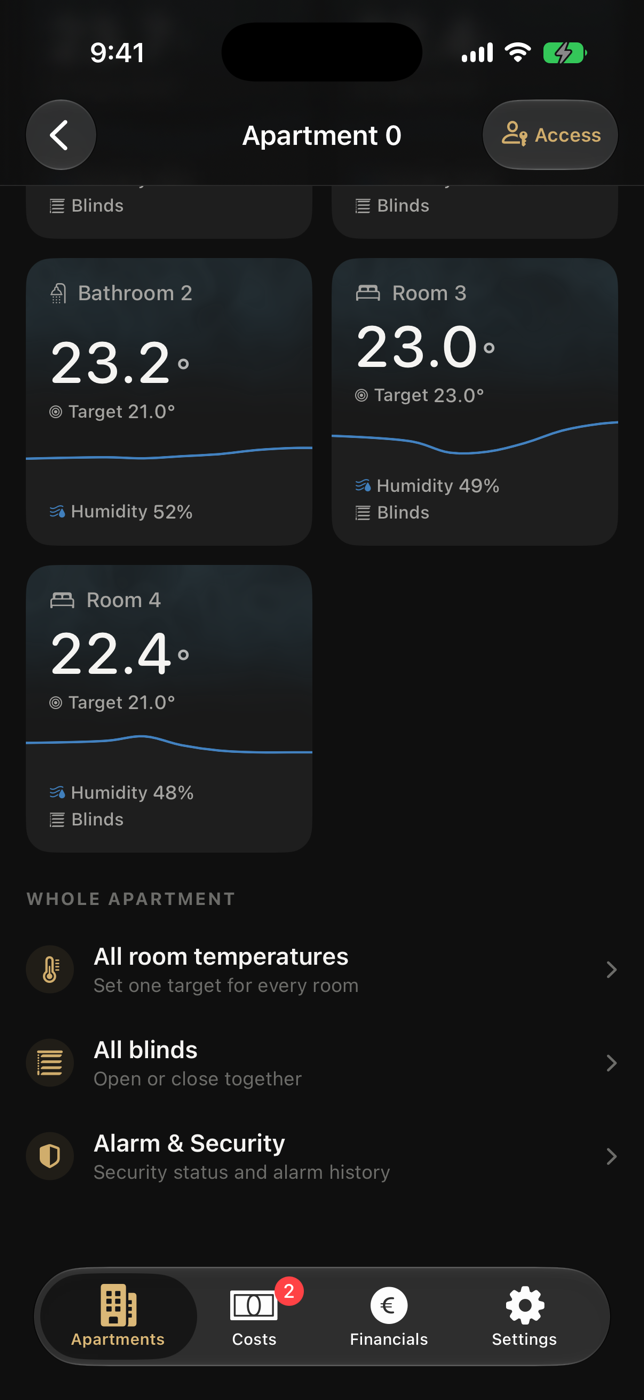
  1. Scroll below the last room card.
    Whole Apartment section with grouped actionsOpen full-size screenshot
    Step 1Whole Apartment at the bottom of Home
  2. Choose All room temperatures, All blinds, Alarm & Security, or Rename apartment.
  3. Use a room card instead when you intend to change only one room or one blind.

What you should see

Whole-apartment actions always open a separate sheet or confirmation before applying a building control.

Back to topics ↑

Set every room to one target

Apply one temperature only when every room should share it.

In the appHome → Whole Apartment → All room temperatures

What to do

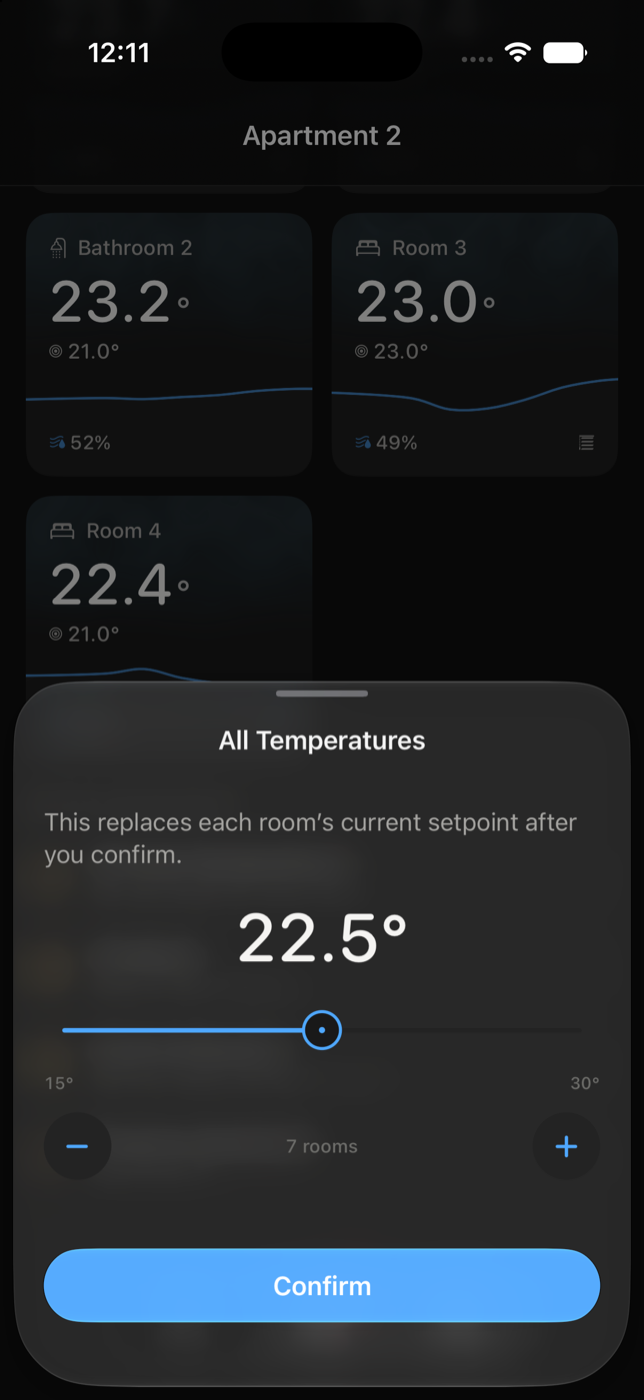
  1. Set the target with the slider or the 0.5 °C minus and plus buttons.
    All Temperatures sheet with slider and Confirm buttonOpen full-size screenshot
    Step 1Choose the shared target
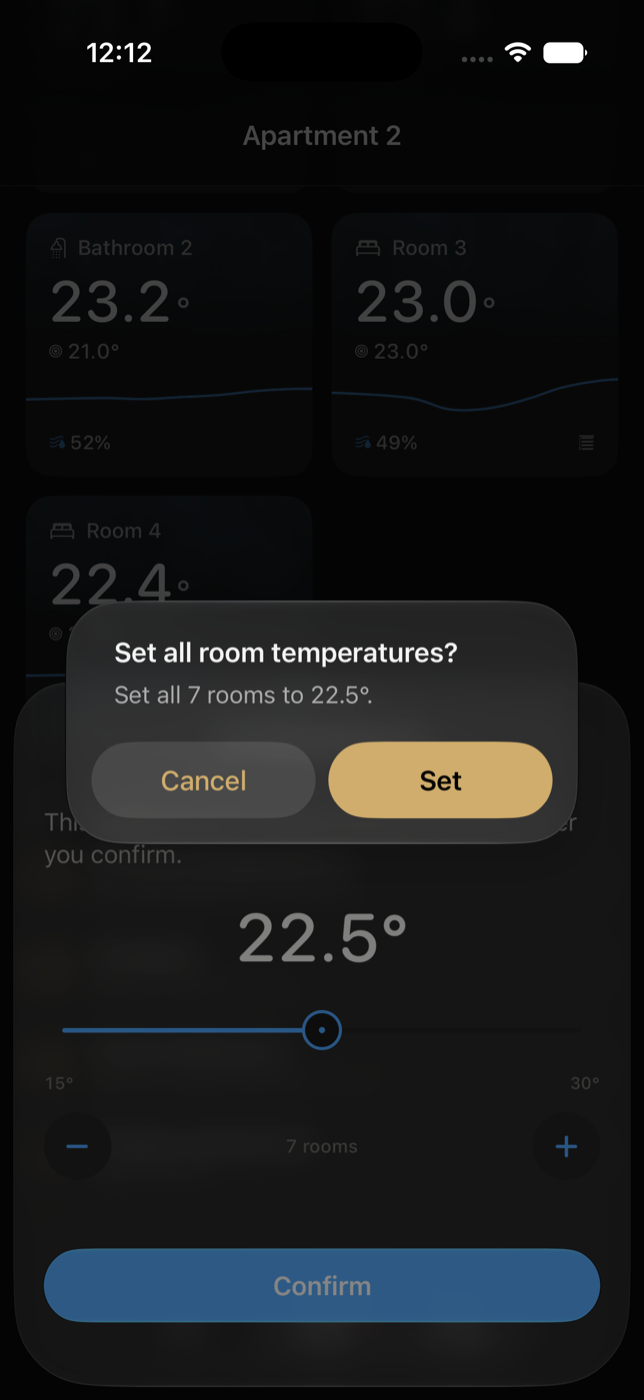
  2. Tap Confirm, then read the native confirmation showing the room count and target.
    Confirmation before setting every roomOpen full-size screenshot
    Step 2The final confirmation
  3. Tap Set to send each room's new target, or Cancel to leave every room unchanged.

What you should see

Each available room is updated and confirmed. Individual room targets can still be changed afterwards.

Important

This replaces each room's current setpoint after you confirm.

Back to topics ↑

Open, close, or stop all blinds

Command every available blind together and keep the window areas clear.

In the appHome → Whole Apartment → All blinds

What to do

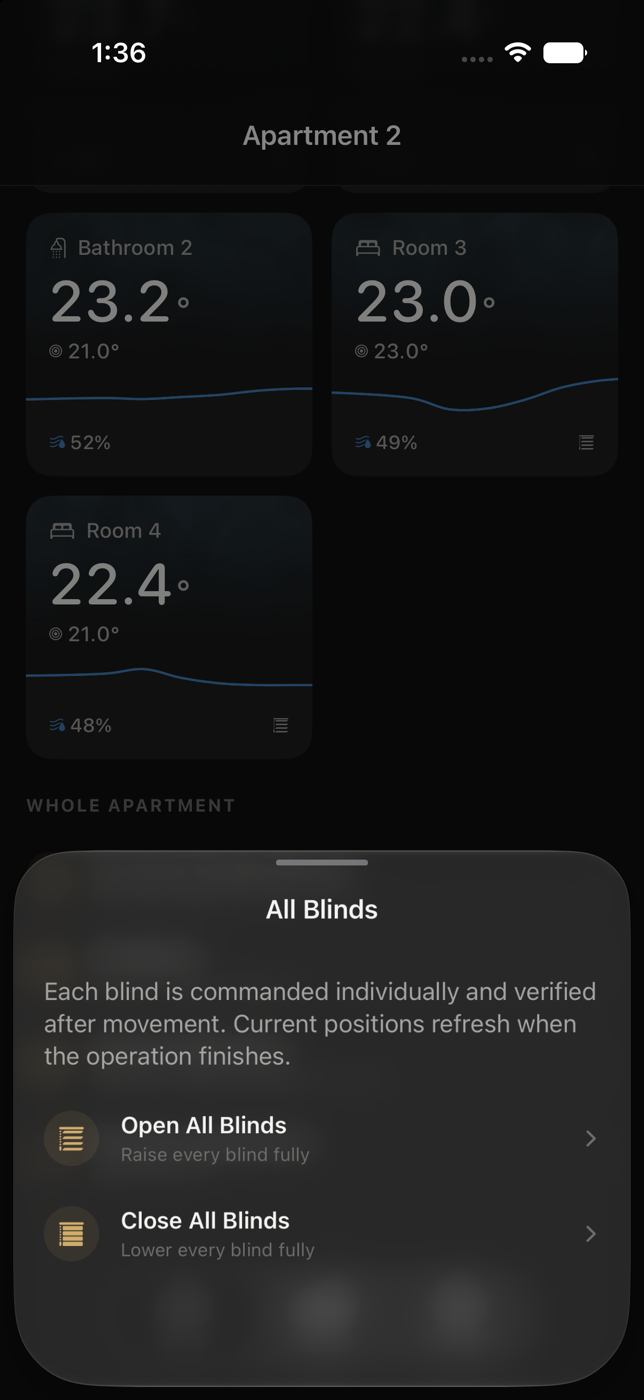
  1. Choose Open All Blinds or Close All Blinds.
    All Blinds sheet with open and close actionsOpen full-size screenshot
    Step 1Choose one apartment-wide blind action
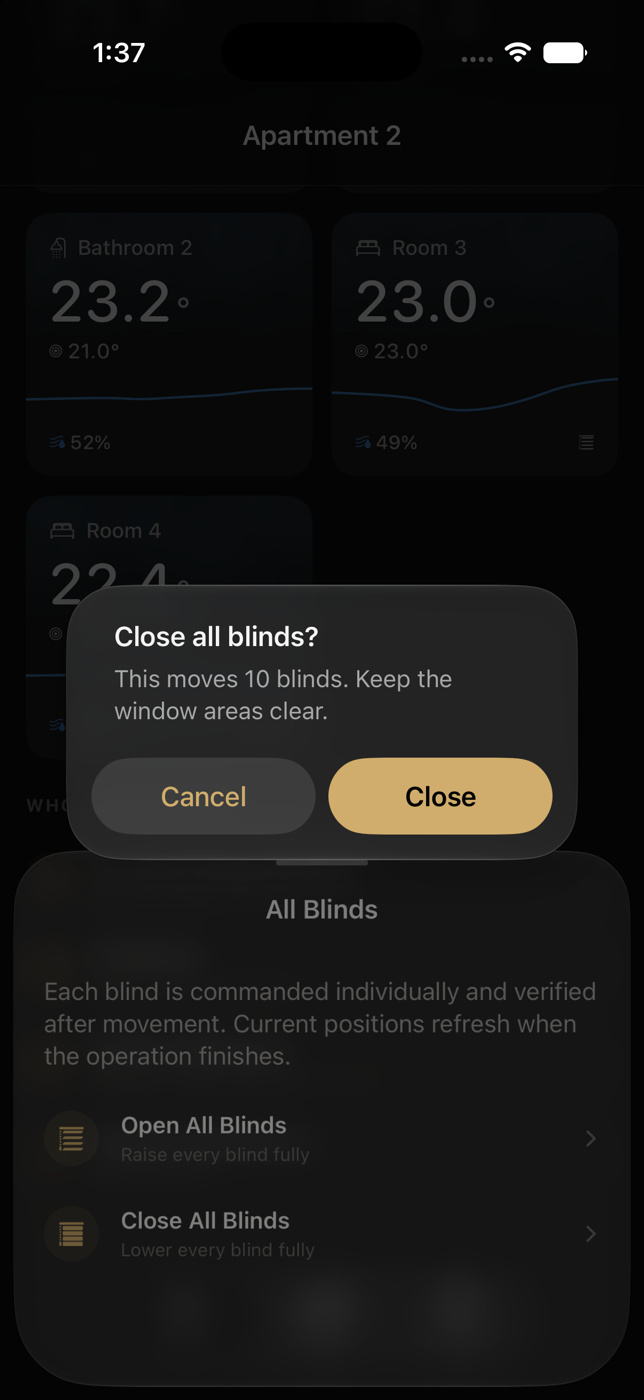
  2. Read the safety confirmation and check how many blinds will move.
    Safety confirmation before closing all blindsOpen full-size screenshot
    Step 2Check the blind count before confirming
  3. Confirm Open or Close. Each blind is commanded and verified individually.
  4. If movement must stop, tap Stop on the active row; the sheet stays open while positions are confirmed.
  5. If blinds are still moving but no row shows an active request, use Stop in the top-right corner.

What you should see

Current positions refresh when the operation finishes. One blind may finish before another without indicating a fault.

Important

This moves every available blind. Keep people and objects away from all window areas.

Back to topics ↑

Use Alarm & Security

Check security, arm or disarm your apartment, and review its alarm history.

In the appHome → Whole Apartment → Alarm & Security

What to do

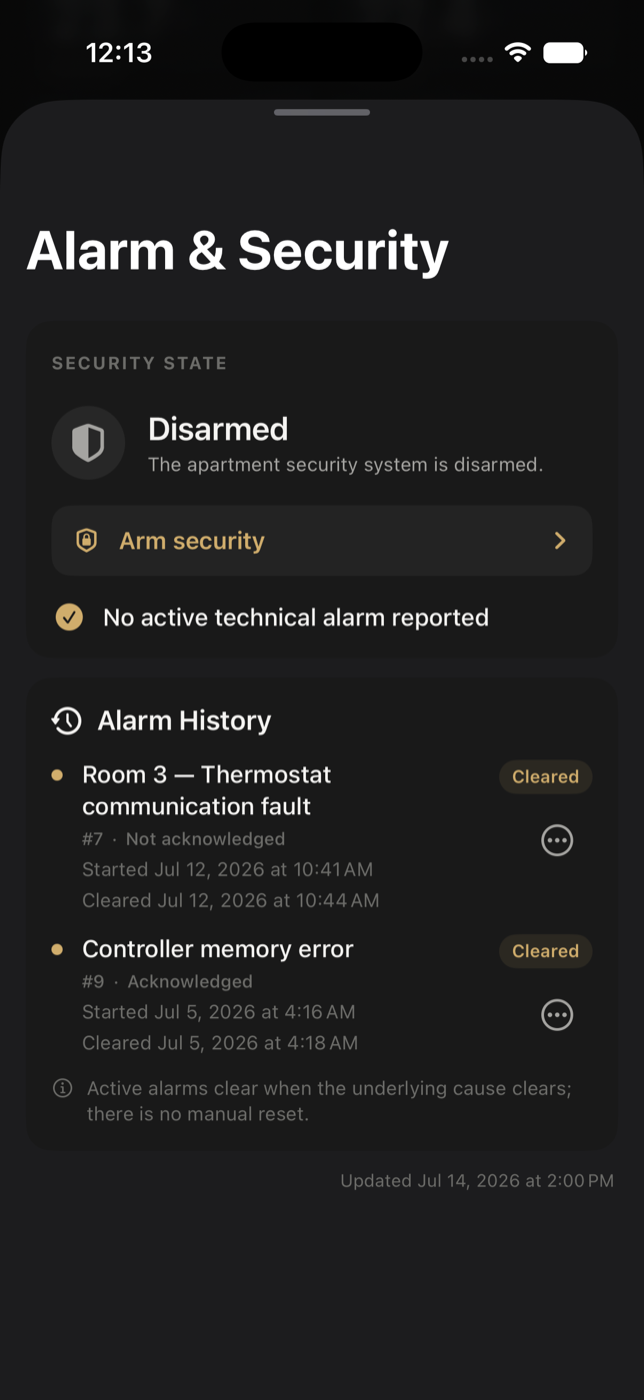
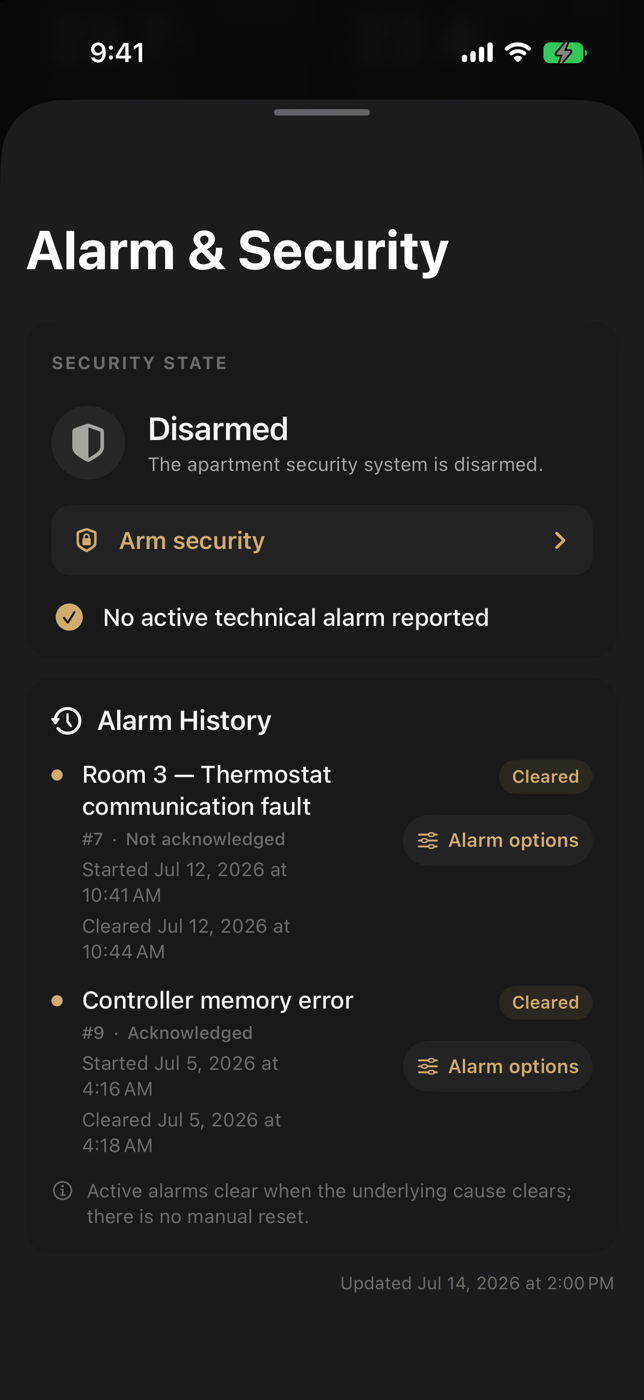
  1. Read both Security State and the technical alarm status first.
    Alarm and Security screen with security state and alarm historyOpen full-size screenshot
    Step 1Security state and technical history
  2. When the action is available, tap Arm security or Disarm security and read the safety confirmation before approving it.
  3. Review Alarm History. The status shows whether each record is Active or Cleared and Acknowledged or Not acknowledged.
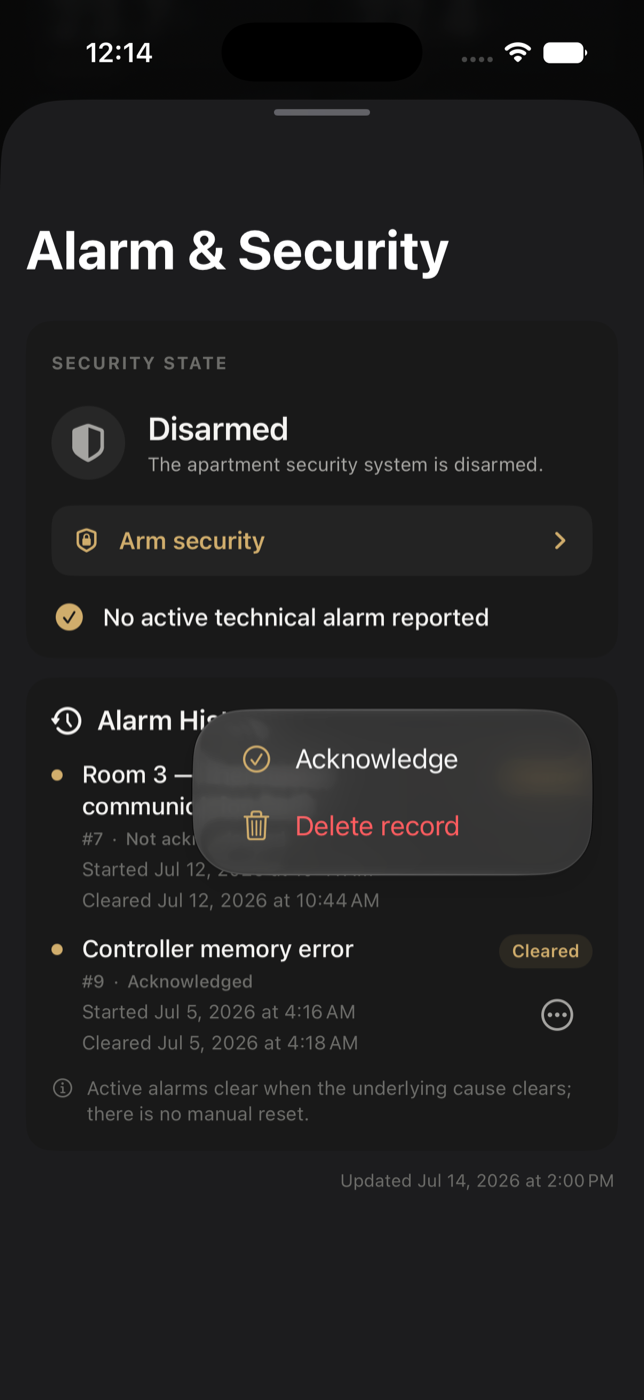
  4. Where history is available, open the three-dot menu to Acknowledge a record. Delete record appears only after the alarm has cleared and removes only the history record.
    Alarm record menu with Acknowledge and Delete recordOpen full-size screenshot
    Step 4Actions for a cleared alarm record

What you should see

The security state and history refresh from the controller. A pending arm/disarm operation offers the opposite action if it must be reversed.

Important

An active alarm becomes Cleared only when its underlying cause clears; there is no manual reset. History unavailable does not mean that the apartment has no alarm.

If this is unavailable

History not available does not mean the history is clear. Record the visible state and contact support. If an action is dimmed, check Settings → Control security; Read-only means this iPhone can view data but cannot send changes.

Back to topics ↑

Usage and readings

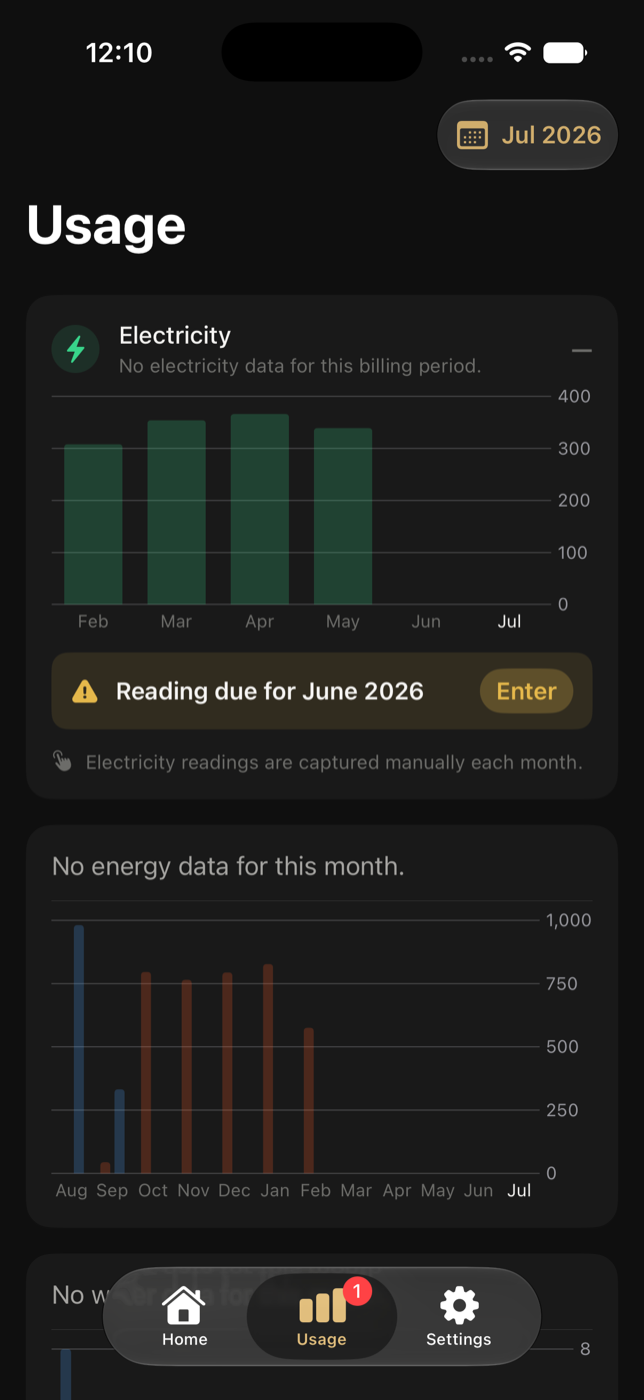
Choose a usage period and compare charts

Usage opens on the previous calendar month; choose another month or range without hiding the rest of your permitted history.

In the appUsage → From / To

What to do

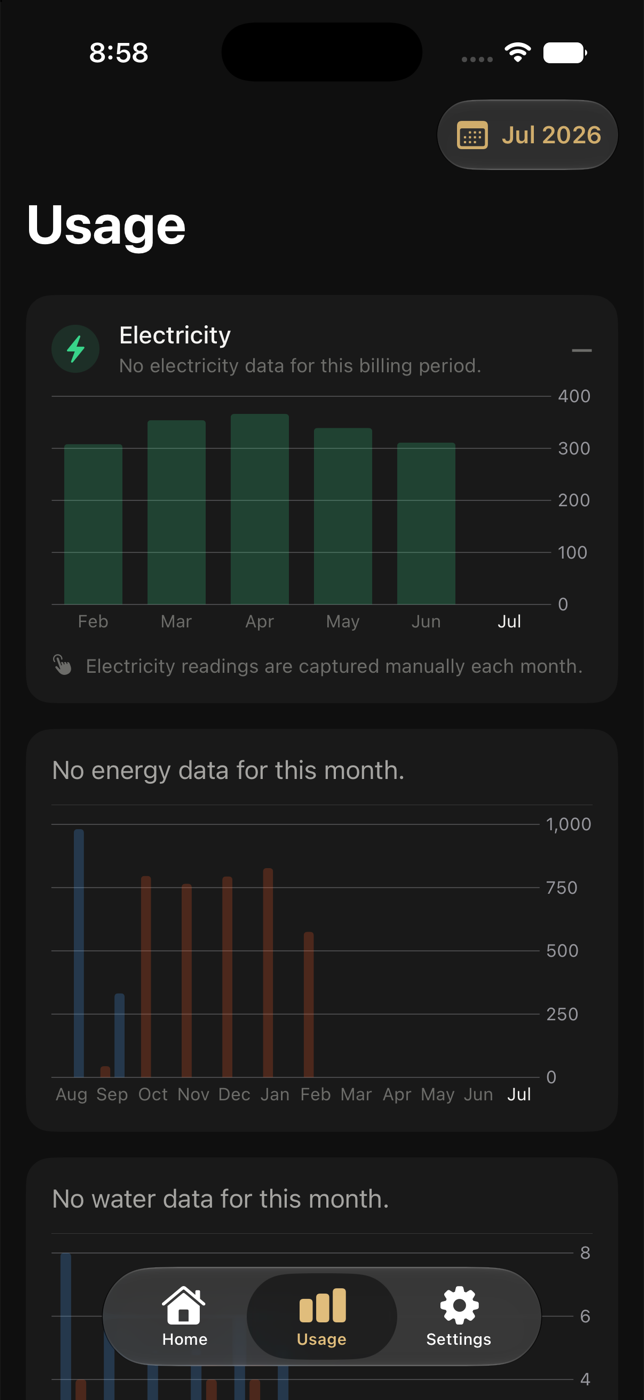
  1. Usage opens on the previous calendar month. Tap From and To only when you want to highlight another month or range in your access period.
    Usage screen with monthly electricity, energy and water chartsOpen full-size screenshot
    Step 1Monthly Usage view
  2. Charts show every month from your access start through the current Budapest calendar month, or through an earlier access end. Future months are never shown as empty space. The selected From / To range only highlights its bars; other visible months stay dimmed.
  3. Usage contains electricity, heating/cooling, Cold Water and Hot Water only. Internet, rent, totals, statements and payment actions are kept in Payments instead. The utility cards rely on the Heating, Cooling, Cold Water and Hot Water row labels rather than repeating those names as card headings.
  4. For one selected month, each utility row shows consumption beneath its label and any server-authored payable amount on the right. The colored row icons identify the matching chart series, so no separate legend is repeated. When a range is selected and the rows are hidden, the chart keeps its legend.

What you should see

The highlighted bars identify the selected period while all permitted usage history through the current month stays visible. Changing the selection never requests a payment statement.

If this is unavailable

Unavailable usage remains absent rather than becoming zero. Pull down once to refresh Usage; a missing or invalid statement response cannot prevent the usage charts from loading.

Back to topics ↑

Enter the monthly electricity meter reading

Enter the meter's full cumulative kWh value for the month that just ended.

In the appUsage → Reading due → Enter

What to do

  1. A red badge on Usage and a Reading due row name the month that needs to be closed. A reading taken on 1 August closes July.
    Usage screen with a Reading due row and Enter buttonOpen full-size screenshot
    Step 1The due month is stated explicitly
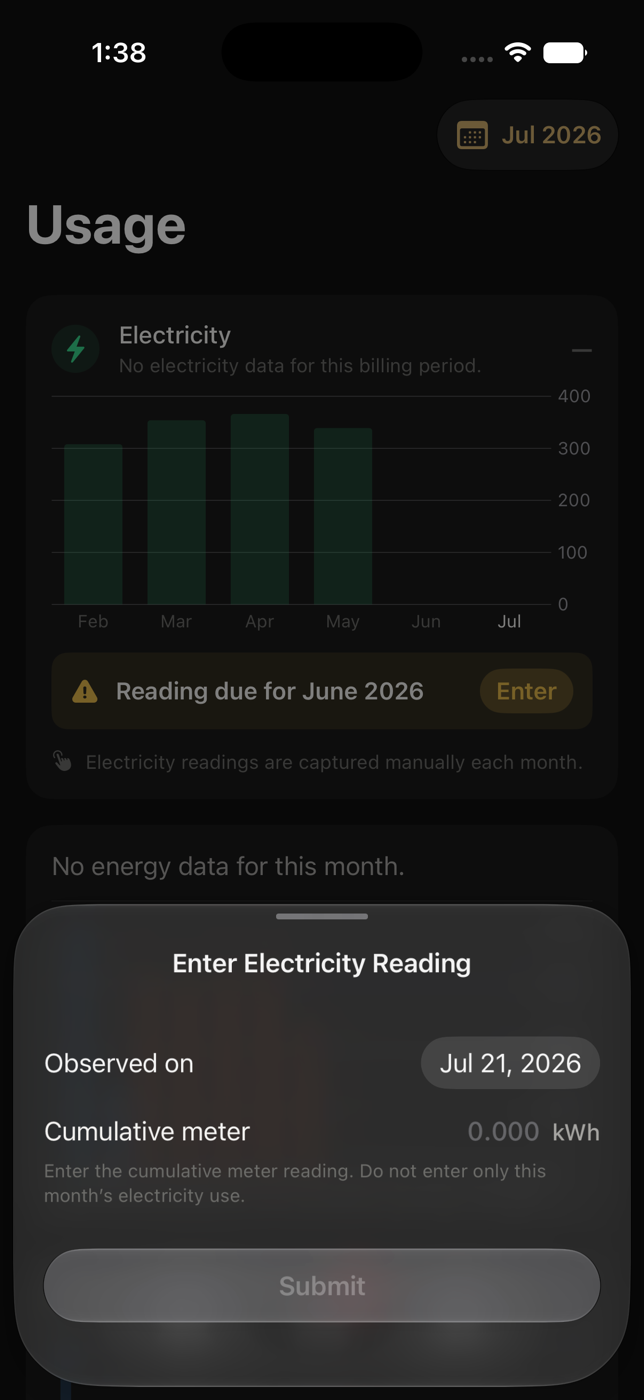
  2. Tap Enter. The server records the Budapest calendar date when you submit the reading.
    Enter Electricity Reading sheet with cumulative meter fieldOpen full-size screenshot
    Step 2Enter the full cumulative meter value
  3. Under Cumulative meter, copy the complete kWh number shown on the physical meter. Do not enter only that month's difference.
  4. Tap Submit once. If the result is unknown, use Retry without changing the retained value.

What you should see

After the server accepts the reading, the due row and Usage badge disappear immediately and remain absent until a new monthly reading is due. Monthly consumption is calculated from consecutive cumulative readings.

Important

The value cannot be lower than the previous reading or higher than a known later reading. Up to three decimal places are accepted.

If this is unavailable

If Submit is dimmed after entering a valid value, open Settings and check Control security. Read-only means this iPhone can view data but cannot send changes; contact Support instead of repeatedly tapping.

Back to topics ↑

Payments

Review monthly statements

Payments lists every closed contract month newest first, even when some billing data is missing.

In the appPayments → Month

What to do

  1. Open Payments. Every closed month from the start of your access through the previous calendar month is listed newest first, stopping at your access end when it is earlier. Payments has no From / To selector, and the ongoing month is never listed.
  2. Every expected month keeps the same card with separate Utilities and Rent & Charges cells. Tap any month to open those same two sections in its dedicated detail.
  3. Until the landlord approves that month's exact complete utility calculation, Utilities says exactly Missing in both the list and detail. It shows no utility values, breakdown, amount, status, Pay Utilities action or utility bank details. Approval later fills that same old month in place.
  4. After approval, Utilities shows the available electricity, heating, cooling, Cold Water, Hot Water and Internet values. Cold Water and Hot Water show the reviewed period’s m³ consumption and the server-authored payable amount. You never see provider-formula, correction, reconciliation, revision, fingerprint or calculation-provenance history.
  5. Rent, common costs, garage and storage remain independent of utility approval and appear as separate lines under Rent & Charges when configured. They combine into one monthly EUR total with one property-charge destination and status.
  6. A partial first or last month keeps its Utilities cell. It shows the shared corrected bill only after approval and only when the reviewed Billing period fits inside your access. The landlord sees the same amount. Otherwise it stays Missing; no period outside your access is charged or disclosed. This temporary feature does not extend access or support settlement after access expiry.

What you should see

The month directory and its two-category structure stay complete and predictable. Approval changes the contents of the existing Utilities cell; it never adds, removes or moves a month.

Important

Missing means unavailable or not yet approved, never zero. Rent & Charges does not wait for Utilities. Payment status never changes a server-authored amount.

If this is unavailable

Before utility approval, Missing is the entire resident-facing Utilities result—not a subtotal and not an amount to pay. After approval, an exact-zero utility amount says Nothing to pay and shows neither status nor action. Payments never shows a technical missing-statement warning, readiness button, money dash or disabled placeholder payment action.

Back to topics ↑

Copy transfer details and report a payment

Gabor Villa shows where to transfer each obligation; the transfer itself happens only in your bank.

In the appPayments → Month → Pay Utilities / Pay Rent & Charges

What to do

  1. Pay Utilities appears only after the landlord approves that month's exact utility calculation and the resulting obligation is payable with complete transfer details. Pay Rent & Charges follows its independent existing rule. A disabled placeholder button is never shown.
  2. The two actions open separate payment bottom sheets because utilities and property charges may use different destinations, currencies or reference text.
  3. Use Copy beside the amount, beneficiary, IBAN, optional bank and SWIFT/BIC, and payment reference. The amount already includes its currency. Verify every copied value in your banking app.
  4. Complete the transfer in the bank of your choice. Gabor Villa never opens a bank, redirects a payment or receives banking credentials.
  5. Return to the matching sheet and tap the reserved Mark as paid action at the bottom only after the transfer was submitted. It occupies its own layout space and never covers the bank details. The sheet has no top action buttons.
  6. After you mark it, the status is Awaiting confirmation. The landlord verifies the receipt, opens that exact apartment and month in Costs, and uses the gold Mark as paid action in the matching Utilities or Charges card. Rent & Charges can also become Paid when the landlord independently confirms receipt before you mark it; Published Utilities can also be confirmed directly when the landlord independently verifies bank receipt. The landlord view has no payment-reset action.

What you should see

Utilities and rent-and-charges keep independent payment states for that finalized month. Buttons appear only when they start a real Pay or Mark as paid flow.

Important

Mark as paid is your declaration that the transfer was submitted, not bank confirmation. Never mark a transfer paid merely because details were copied. Utility correction, reconciliation and calculation provenance are landlord/internal history and are not shown to residents.

Back to topics ↑

Settings and troubleshooting

Turn notifications on or off

One Notifications switch manages every resident notification on this iPhone.

In the appSettings → System → Notifications

What to do

  1. Turn on Notifications. Allow notifications when iOS asks, or enable them later in iOS Settings.
  2. While the switch is on, the iPhone schedules a local meter reminder for 09:00 Budapest time on the first day of each month. Tapping it opens Usage.
  3. The same switch enables alerts when a statement is ready and when the landlord records a payment awaiting confirmation as paid. These alerts open the matching finalized month in Payments.
  4. Turn the switch off to remove the monthly reminder and stop statement and payment alerts on this iPhone.

What you should see

One switch controls monthly meter reminders, statements and payment status. Tapping a notification opens the app; sign in or unlock if asked. Only a valid, authorized destination opens a bill or meter entry. A notification without a valid destination does not change the current screen. Notifications contain no bank credentials, meter values or date of birth.

Important

Notification controls appear only in Settings; Usage, Payments and other content screens show no notification banner. Real controls and payment notifications require the TestFlight or App Store build. A directly installed development build can keep live actions read-only. Utility transfer details never reveal a month by themselves: exact landlord approval sends its deduplicated Statement Ready alert. Rent & Charges remains independent.

Back to topics ↑

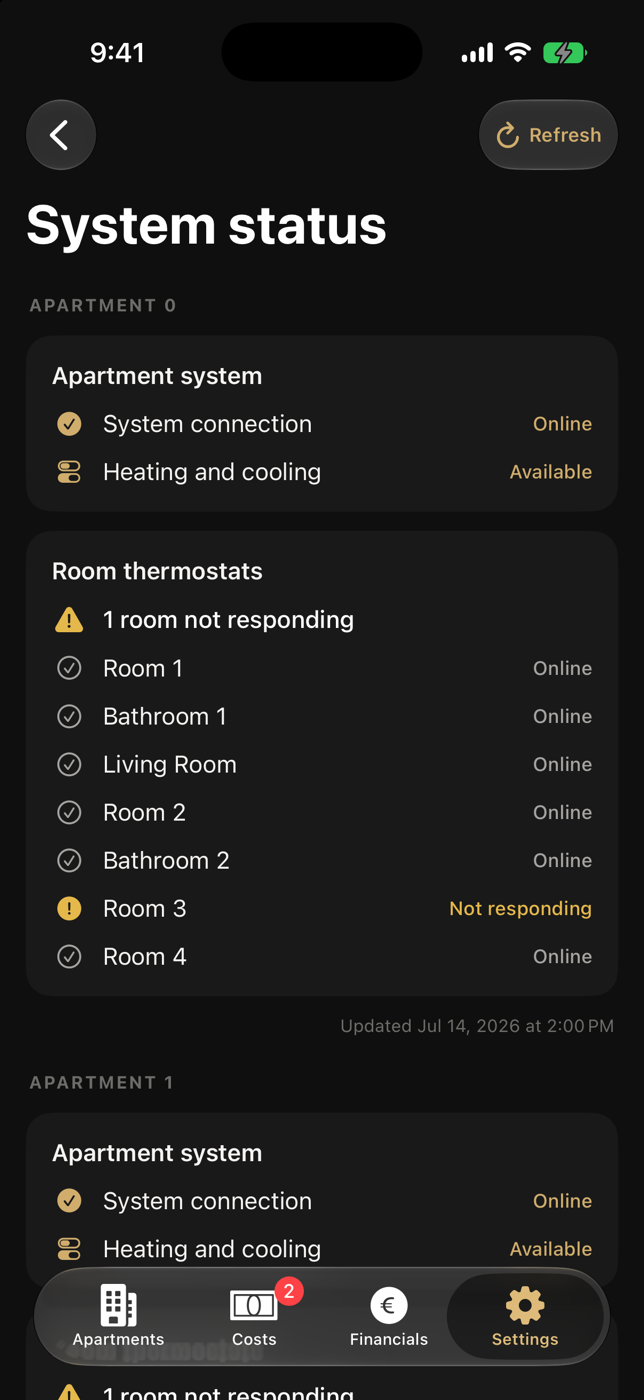
Check System Status before retrying a control

Use this page to tell apart app, building-controller and thermostat problems.

In the appSettings → System Status

What to do

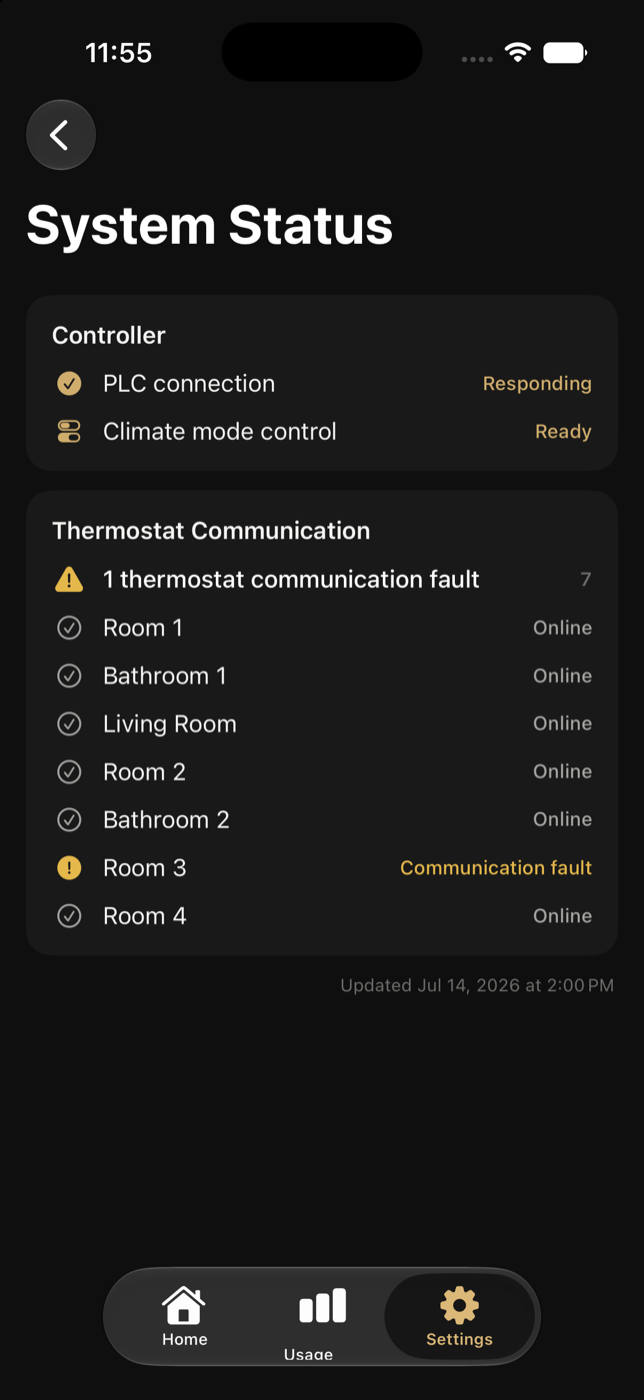
  1. Check Building controller (PLC). Responding means a current read succeeded; Last known means the screen may be showing older data.
    Resident System Status showing building-controller and thermostat communicationOpen full-size screenshot
    Step 1Controller and thermostat checks
  2. Check Climate mode control for Ready, Read-only, Not configured or Commissioning required (not yet set up for control).
  3. Review Thermostat Communication. A room is listed as Online, Communication fault, Unknown or last-known.
  4. Pull down once to refresh, then note the apartment, room and update time if support is needed.

What you should see

System Status is for checking information only; it does not restart the building controller or clear a physical fault.

Back to topics ↑

Read Settings, get help, sign out, or delete the account

Settings contains your access details, security status, support, app information and account actions.

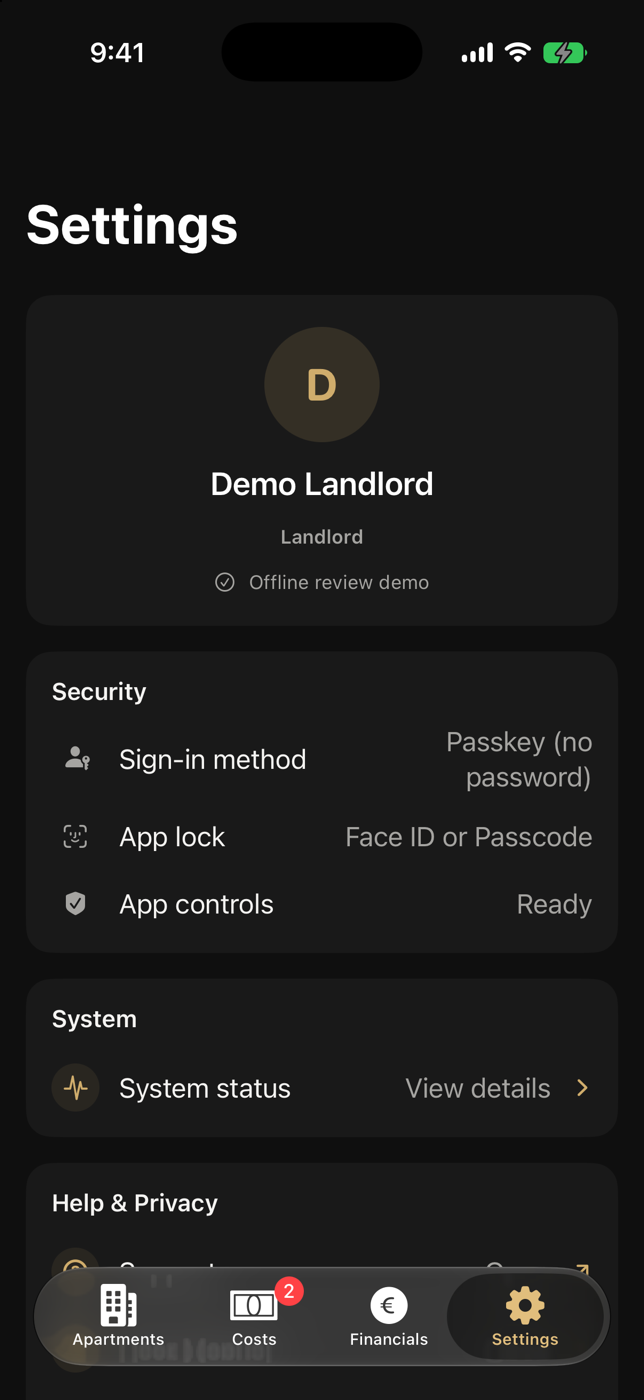
In the appSettings → Help & Privacy / bottom of page

What to do

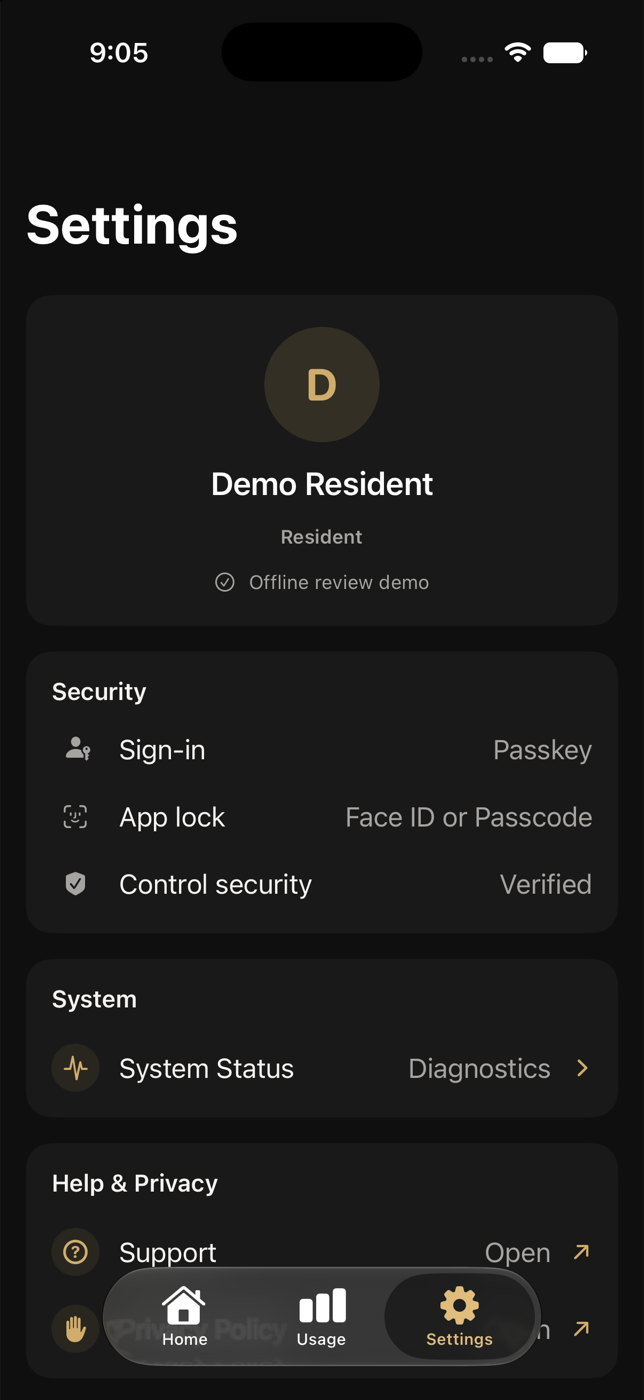
  1. At the top, check your profile name, Resident role and the date until which access is valid.
    Resident Settings with security, system, support and account sectionsOpen full-size screenshot
    Step 1Resident Settings
  2. Security shows Passkey sign-in, the Face ID or passcode app lock, and whether this iPhone is verified for controls.
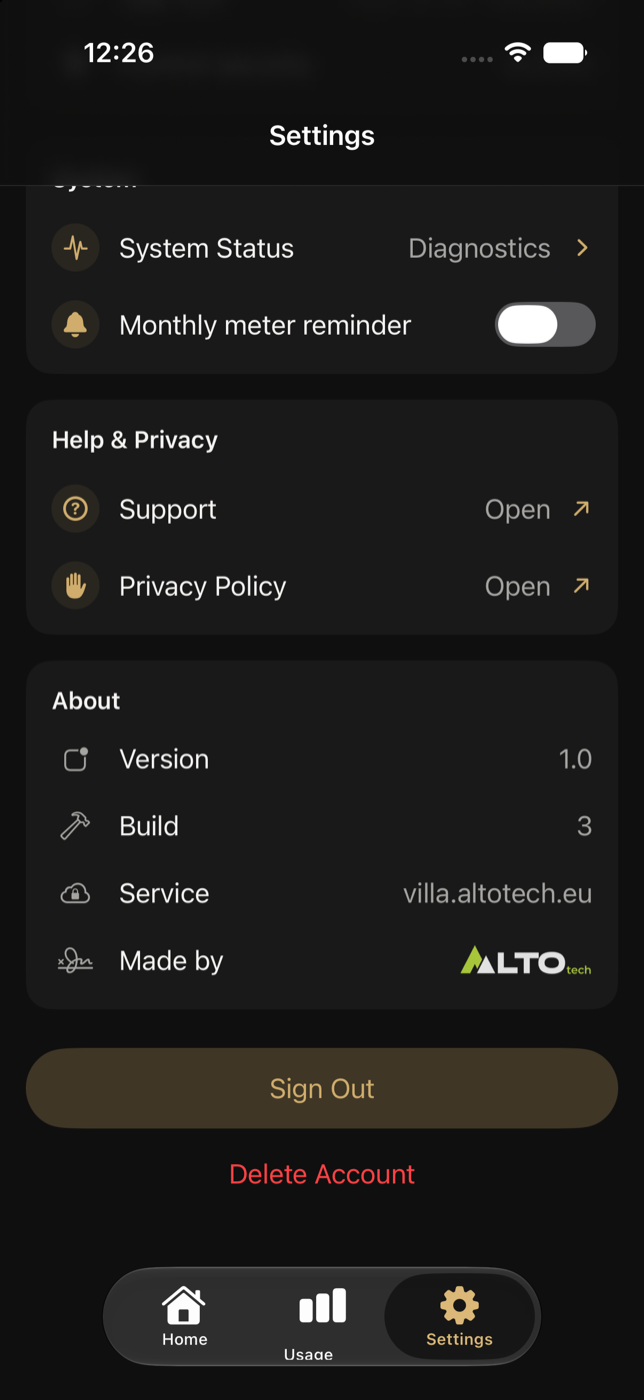
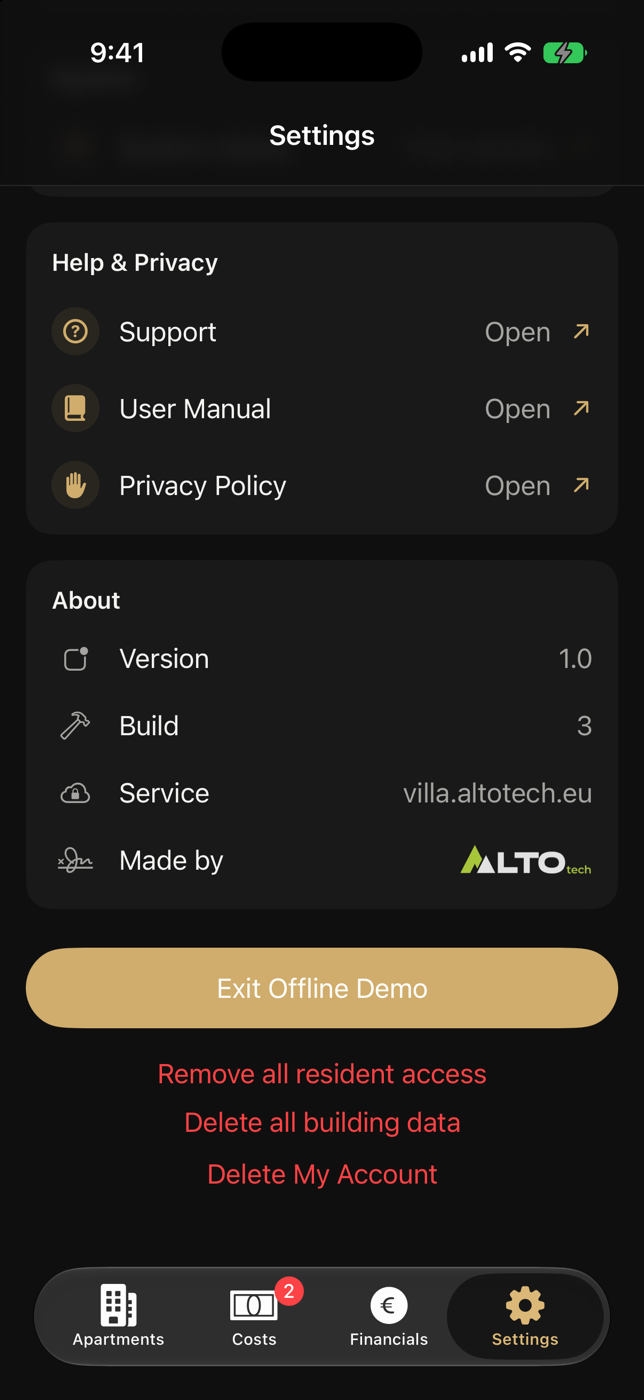
  3. Open User Manual for the resident-only instructions. Use Support for access, controls, readings, statements or unexplained diagnostics. Privacy Policy explains stored data. About lists Version, Build, the service domain and the clickable AltoTech attribution.
  4. Tap Sign Out to end this app session. The passkey stays saved on the iPhone.
    Lower Resident Settings with Sign Out and Delete AccountOpen full-size screenshot
    Step 4Account actions stay at the bottom of Settings
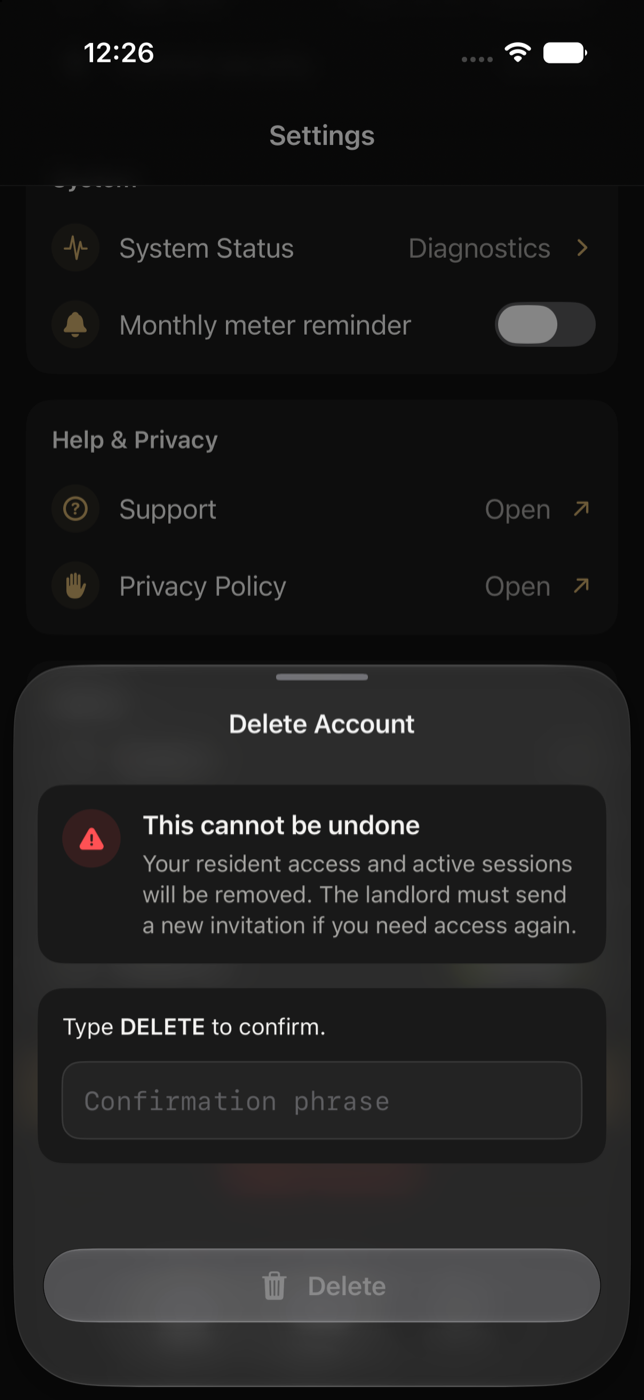
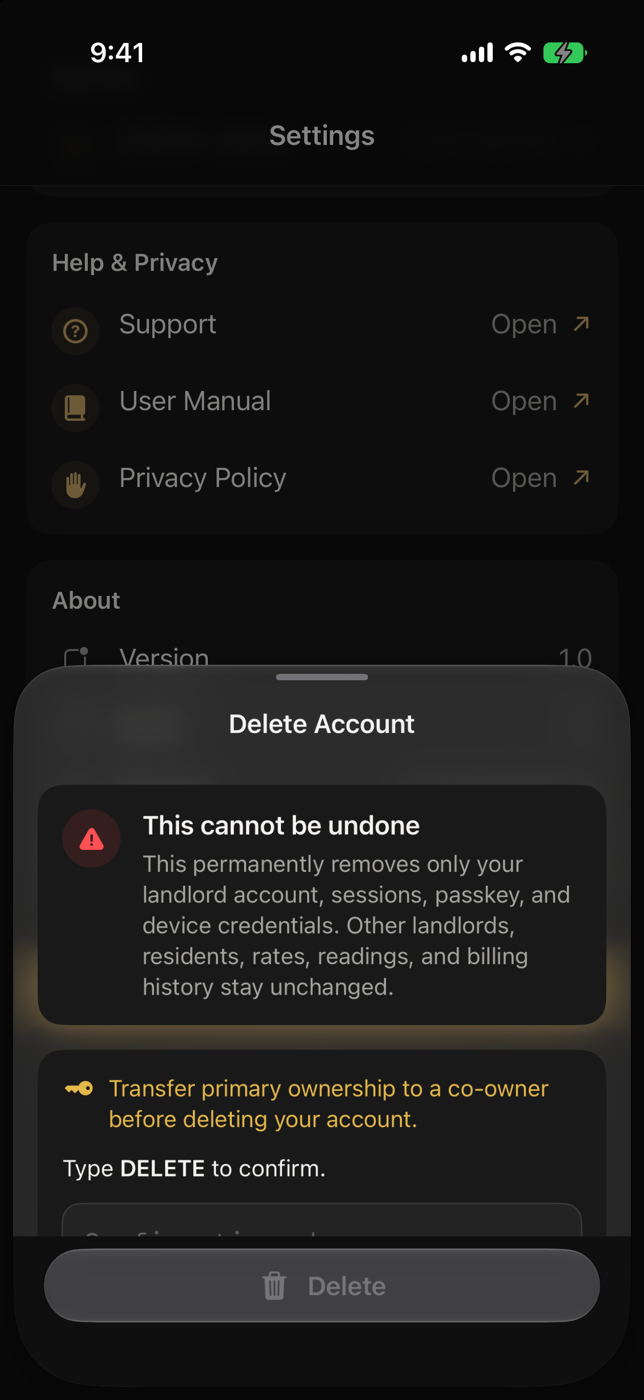
  5. To permanently remove resident access, tap Delete Account, read the warning, type DELETE and confirm Delete.
    Delete Account sheet requiring the confirmation wordOpen full-size screenshot
    Step 5Permanent resident deletion requires the exact confirmation

What you should see

Deleting the account removes resident access and active sessions. Returning later requires a new landlord invitation.

Important

Control security shows Verified when this iPhone can safely send changes. If it says Read-only, viewing remains available but controls are blocked. After account deletion, the old passkey may remain visible in Passwords, but Gabor Villa no longer accepts it; you may remove it there.

Back to topics ↑

This page is read-only. Nothing here can change an apartment or the building.